• About
  • Fan Favorites
  • Contact
  • Shop
The Schmidty Wife

The Schmidty Wife

real fresh food for real fun families

  • All Recipes
  • Weeknight Dinners
    • 30 Minutes or Less
    • Skillet
    • Casserole
    • Sheet Pan
    • Main Dish
    • Crockpot
  • Browse By Type
    • Pasta
    • Mexican
    • Asian
    • Fun Foods
    • Leftovers
    • Tacos
  • About
  • Fan Favorites
  • Contact
  • Shop
  • All Recipes
  • Weeknight Dinners
    • 30 Minutes or Less
    • Skillet
    • Casserole
    • Sheet Pan
    • Main Dish
    • Crockpot
  • Browse By Type
    • Pasta
    • Mexican
    • Asian
    • Fun Foods
    • Leftovers
    • Tacos

Easy Antipasto Salad

February 10, 2021 by Lauren Schmidt Leave a Comment

This Easy Antipasto Salad goes a little off trend using easy salad ingredients like chickpeas and giardiniera pickled vegetables, but it sure packs a flavor filled punch! This salad involves just a little prep and a very quick easy oregano dressing. This is an Antipasto Salad Recipe you will be coming back to again and again.

This post may contain Affiliate Links.

Overhead view of a glass bowl with the toppings for easy antipasto salad laid out evenly over a bed of arugula lettuce.

The Best Antipasto Salad

What is an ‘Antipasto Salad’?

Great question, if we break it down ‘antipasto’ is the first course in an Italian meal. So an Antipasto Salad is the first course salad in an Italian meal.

Traditionally antipasto dishes include ingredients like cured meats, olives, peperoncini, mushrooms, anchovies, artichoke hearts, cheeses like provolone or mozzarella, and vegetables in oil or vinegar.

This leaves a lot open to interpretation which is why you will see many versions of an antipasto salad, especially in present day American cuisine.

My inspiration for this version of Antipasto Salad came from one of my favorite cookbooks Healthyish by Lindsay Maitland Hunt. In one of her recipes she uses giardiniera pickled vegetables for her ‘pizzeria salad’ and I was instantly hooked.

I quickly made this salad my own. Adding in other traditional and non-traditional (chickpeas?!?) ingredients in this salad.

In my opinion this is the perfect salad to go with pizza, pasta, or really an Italian inspired dish!

Another awesome aspect of this dish is it is great to prep ahead, making it perfect for cookouts or picnics!

Dressed topping over a bed of arugula make up this easy antipasto salad.

So let’s see what we need…

Supplies

This recipes requires nothings fancy:

  • Knife & Cutting Board
  • Large bowl for tossing salad (and serving bowl if you want a nicer one for presentation)
  • Tongs
  • Measuring cups & spoons
  • either a small bowl with whisk OR a jar for making the quick dressing

Ingredients

  • Baby Arugula
  • Salami
  • Chickpeas
  • Giardiniera
  • Provolone
  • Olive Oil
  • Red Wine Vinegar
  • Dried Oregano
  • Salt
  • Black Pepper

For a complete detailed list of the ingredients continue towards the bottom of the page.

Ingredients for an easy antipasto salad laid out on a table top.

A nice thing about a salad like this is that a lot can be substituted and/or added.

  • add olives if you see fit
  • use mozzarella instead of provolone
  • add tomatoes
  • use romaine instead of arugula
  • add artichoke hearts

While I do think this salad is pretty darn good as written, feel free to make it your own!

Overhead view of a tossed antipasto salad in a glass bowl showing off salami, cheese, chickpeas, and pickled Italian vegetables.

Instructions

You will begin by prepping all the toppings. Dice the salami into bite size pieces. Cube the provolone into small pieces. After draining the liquid from the giardiniera mix chop the overly large pieces for easier eating. Lastly drain and rinse the chickpeas. 

Next you will make the quick dried oregano dressing aka my quick cheat version of an Italian dressing but just as effective. Combine the olive oil, red wine vinegar, oregano, salt, and pinch of pepper in a small jar. Close the jar and shake to combine (or whisk together in a bowl).

Now you will just build your salad, in a large bowl add the arugula, salami, chickpeas, giardiniera, provolone, and dressing. Toss well to mix. Serve immediately.

Homemade oregano dressing being poured over a bowl of antipasto salad.

How to prep this Antipasto Salad ahead of time

This salad works wonderfully for making ahead. Perfect for a picnic. I also have found it easy to prep for lunches.

Do do this simply add all the toppings to a large bowl that has a lid, make the oregano dressing and add it to the toppings. You are basically marinating the toppings, which yes makes it a little better. Keep the toppings/dressing separate from the arugula and when it is time to eat just mix them together!

A tossed easy antipasto salad in a glass salad bowl showing off cheese cubes, salami, and pickled vegetables.

You might also like:

  • For a complete meal: How to make the Best Homemade Pizza
  • Simple Spinach Salad
  • Summer Berry Salad with Grilled Chicken
  • Grilled Shrimp Salad with Avocados
  • Easy Panzanella Salad with Grilled Chicken
  • Healthy Grilled Chickpea Salad
  • Crunchy Asian Chopped Chicken Salad
Yield: serves 6 small plates

Easy Antipasto Salad

Overhead view of a glass bowl with the toppings for easy antipasto salad laid out evenly over a bed of arugula lettuce.

Easy to make and prep ahead this antipasto salad with chickpeas is sure to delight as a great side salad or as a tasty main dish!

Prep Time 10 minutes
Total Time 10 minutes

Ingredients

  • 5 ounces baby arugula
  • 3 ounces salami
  • 1 (14oz) can chickpeas
  • 16 ounce jar giardiniera
  • ½ cup provolone

For the Oregano Dressing

  • ¼ cup olive oil
  • ¼ cup red wine vinegar
  • ½ teaspoon dried oregano
  • ½ teaspoon salt
  • pinch black pepper

Instructions

  1. Prep the toppings. Dice the salami into bite size pieces. Cube the provolone into small pieces. After draining the liquid from the giardiniera mix chop the overly large pieces for easier eating. Drain and rinse the chickpeas.
  2. To make the oregano dressing combine the olive oil, red wine vinegar, oregano, salt, and pinch of pepper in a small jar. Close the jar and shake to combine (or whisk together in a bowl).
  3. Build your salad, in a large bowl add arugula, salami, chickpeas, giardiniera, provolone, and dressing. Toss well to mix. Serve immediately.

Notes

To prep for a picnic or cookout. Combine prepped topping and mix with dressing, keep in an airtight container separate from arugula. Once ready to eat combine the toppings with dressing and the aruglua.

This could easly feed about 3 people as a main course.

Recommended Products

As an Amazon Associate and member of other affiliate programs, I earn from qualifying purchases.

  • Mezzetta Italian Mix, Giardiniera, 16-Ounce (Pack of 3)
    Mezzetta Italian Mix, Giardiniera, 16-Ounce (Pack of 3)
  • Stainless Steel Mixing Bowls (Set of 6) Nesting Bowls, Great for Cooking, Baking, Prepping
    Stainless Steel Mixing Bowls (Set of 6) Nesting Bowls, Great for Cooking, Baking, Prepping

Nutrition Information:

Yield:

6

Serving Size:

1/6 of salad

Amount Per Serving: Calories: 221Total Fat: 17gSaturated Fat: 5gTrans Fat: 0gUnsaturated Fat: 12gCholesterol: 22mgSodium: 521mgCarbohydrates: 9gFiber: 3gSugar: 2gProtein: 9g

Nutritional data is automated, final nutritional information will depend on ingredients used and any changes made.

Did you make this recipe?

Please leave a comment below on the blog or share a photo with me tag @the_schmidty_wife! Can't wait to see what you made!

© Lauren Schmidt
Cuisine: Italian / Category: Salads

And make sure you are following me on TikTok, Instagram, and Pinterest, for all the latest recipes!

https://www.pinterest.com/theschmidtywife/

Easy Spaghetti Puttanesca Recipe

May 19, 2020 by Lauren Schmidt 2 Comments

Made from pantry staples this recipe for Spaghetti Puttanesca is an easy and convenient dinner for the whole family! Made from mostly canned goods this comfort food can be on your table in about 20 minutes!

This post may contain Affiliate Links.

skillet on a table full of puttanesca pasta garnished with olives and parsley

Easy Pantry Puttanesca Pasta

Pasta Puttanesca is one of those perfect pantry meals that you are able to make in a pinch. So much so in fact I always ensure I have the ingredients some where in my pantry, and once I make it I make sure to restock!

The origins of puttanesca are humble, the story goes that it was invented by an Italian chef who was asked by a wealthy patron to make a dinner after the restaurant’s kitchen was already closed for the evening. So the chef took simple pantry ingredients to whip up a quick yet delicious pasta for his guest.

I think that story yes relates well to when I usually make spaghetti puttanesca for my family…

I usually haven’t been to the store so the fridge is empty, I am tired, and don’t feel like working to hard to get dinner on the table.

So my version of pasta puttanesca varies just slightly off tradition but not a lot! I did just a few tweaks to make the dish ‘saucier’ and a more rounded out flavor.

Basically I just switched out the traditional white wine for red wine, giving it a more rounded and not as sharp flavor. And I prefer using kitchen ready tomatoes aka ground tomatoes to give it a more saucy flavor instead of the traditional diced tomatoes.

My family basically inhales this dinner! So let’s get cooking and see what else you need in this delicious pantry pasta!

a fork spiraling some spaghetti puttanesca in a large skillet garnished by parsley

Pasta Puttanesca Recipe

For this recipe you will need:

  • Tinned Anchovies Fillets in Oil – These come in little 2oz tins in the canned fish/meat section of the grocery store. I like to use the oil that comes with the anchovies for cooking but you can always just add more of your own olive oil if you don’t want to do that. You can use a big squeeze of anchovy paste if that’s what you have!
  • Garlic – Probably the item most likely not to be in your actual pantry. You can use fresh minced garlic from cloves or pre-minced garlic from a jar. In a pinch I have also used a dash of dried minced garlic from my spice cabinet when I wanted to make this but didn’t have fresh garlic (but if you do this only used about half of the amount as you wold fresh garlic).
  • Olive Oil – The higher quality the better in a dish like this!
  • Black & Green Olives – You can sub out Kalamata olives for one of the varieties if you would like! I half mine to make it easier to eat.
  • Capers – If you haven’t cooked with capers before, capers are actually immature flower buds from a caper bush. They are pickled in a brine and bring out such a fun pop of lemony salty goodness. They are often found next to the olives in grocery stores in small jars. You will want to drain the liquid from the jar before using.
  • Kitchen Ready Tomatoes – You will want the large 28oz can for this recipe. Kitchen ready tomatoes are stone ground tomatoes which are a perfect consistency for a quick sauce, they are chunky enough for good texture but also ground down enough to make a good sauce. In a pinch you can used other types of canned tomatoes like diced tomatoes or even whole canned tomatoes squished into pieces.
  • Red Wine – Any variety here will do, so use what you like. I often will use a red blend for a nice rounded out flavor. Plus bonus you will know exactly what wine to pair with dinner! (Also for those of your concerned the alcohol does boil out)
  • Spaghetti – I use a whole one pound box, it is just the right amount for how much sauce is made.

I will note that if you like a little heat in your dishes a dash of red pepper flakes would be a good addition!

Layout of all of the ingredients needed for Spaghetti Puttanesca including wine, spaghetti, tomatoes, olives, capers, anchovies, oil, and garlic

Making Spaghetti Puttanesca

First you will prep the water for the spaghetti. In a large pot bring 6 quarts of water to a boil. Once the water is boiling add a few dashes of salt and add the spaghetti. Cook to al dente about 8 minutes.

Now while the water is heating up start the sauce.

In a large skillet over medium-high heat drain the oil from the tin of anchovies and add the olive oil, heat until shiny and hot.

Roughly chop the anchovies. Add the anchovies and garlic to the skillet. Cook 2 to 3 minutes until super fragrant but making sure not to burn the aromatics.

Next you will deglaze your skillet with the wine (make sure there are no yummy brown spots on the bottom).

Add in all the olives, capers, and tomatoes. Cook over medium-high heat stirring occasionally until sauce thickens. About 8-10 minutes while the pasta cooks.

When pasta is done reserve about a cup of the pasta water just in case the sauce is too thick, then drain pasta.

In the large pot you used for the spaghetti toss the sauce and pasta together. (It is was cleaner to do it in the pot than the skillet!) Add in a little of the reserved pasta water if needed (it doesn’t always need it).

Serve immediately! Garnish with parmesan cheese and parsley if desired.

a large skillet with spaghetti Puttanesca garnished with parsley

Does the anchovies make Puttanesca taste fishy? What does puttanesca taste like?

Nope! Not fishy. Puttanesca is strong on the Unami and salty flavor profile. The anchovies definitely bring a Unami flavor to the dish but it does not taste fishy, so even people who don’t care for fish would still like this dish!

What to serve with pasta puttanesca? What can I eat with pasta besides salad?

My first instinct is obviously salad with pasta like a Ceasar Salad or my Simple Spinach Salad.

But if you are looking for something else I would recommend roasted vegetables. My Oven Roasted Broccoli would are great with this pasta dish as well as my Roasted Baby Potatoes!

Does Puttanesca keep well? How do I reheat it?

Because this does makes such a large quantity it is likely you might have some leftover. And it does reheat well if you know the best trick to reheating pasta!

Add liquid! Before you reheat any pasta dish in the microwave always add in some water, even better if you have enough foresight save some of the reserved pasta water.

Now you don’t want to saturate the pasta in water but get a good coat over the pasta noodles and the spaghetti will heat up without drying out!!

So I usually will splash a plate with water give it a little stir and microwave it 2-3 minutes depending on the amount. Hopefully this hack will change your life! (maybe a bold statement but you should definitely try it)

close up of pasta twirled into nests inside of a large skillet garnished by olives and parsley

Looking for more pasta dishes? You might like these:

  • Summer Spaghetti Carbonara
  • Crockpot Bolognese Sauce
  • White Chicken Chili Mac & Cheese
  • Healthier Cajun Chicken Pasta
  • Sheet Pan Gnocchi
Yield: 8 servings

Pasta Puttanesca

skillet on a table full of puttanesca pasta garnished with olives and parsley

Made from pantry staples this recipe for Puttanesca is an easy and convenient dinner for the whole family! Made from mostly canned goods this comfort food can be on your table in about 20 minutes.

Prep Time 5 minutes
Cook Time 15 minutes
Total Time 20 minutes

Ingredients

  • 1 2oz tin fillet anchovies + oil
  • 4 teaspoons minced garlic OR 8 garlic cloves, minced
  • 1 teaspoon olive oil
  • 1 cup black olives, halved
  • 1 cup green olives, halved
  • 1 3.5oz jar capers, drained
  • 28oz can kitchen ready tomatoes
  • 1/2 cup red wine
  • 1 16oz box spaghetti

Instructions

  1. In a large pot bring 6 quarts of water to a boil. Once the water is boiling add a few dashes of salt and add the spaghetti. Cook to al dente about 8 minutes.
  2. While the water is heating up start the sauce. In a large skillet over medium-high heat drain the oil from the tin of anchovies and add the olive oil, heat until shiny and hot. Roughly chop the anchovies. Add the anchovies and garlic to the skillet. Cook 2 to 3 minutes.
  3. Deglaze your skillet with the wine (make sure there are no yummy brown spots on the bottom). Add in all the olives, capers, and tomatoes. Cook over medium-high heat stirring occasionally until sauce thickens. about 8-10 minutes while the pasta cooks.
  4. When pasta is done reserve about a cup of the pasta water just incase the sauce is too thick, then drain pasta.
  5. In the large pot toss the sauce and pasta together. Add in a little reserved water if needed (it doesn't always need it). Serve immediately, garnish with parmesan cheese and parsley if desired.

Recommended Products

As an Amazon Associate and member of other affiliate programs, I earn from qualifying purchases.

  • Lodge 6 Quart Enameled Cast Iron Dutch Oven
    Lodge 6 Quart Enameled Cast Iron Dutch Oven

Nutrition Information:

Yield:

8

Serving Size:

1

Amount Per Serving: Calories: 221Total Fat: 10gSaturated Fat: 1gTrans Fat: 0gUnsaturated Fat: 8gCholesterol: 6mgSodium: 1125mgCarbohydrates: 26gFiber: 4gSugar: 4gProtein: 7g

Nutritional data is automated, final nutritional information will depend on ingredients used and any changes made.

Did you make this recipe?

Please leave a comment below on the blog or share a photo with me tag @the_schmidty_wife! Can't wait to see what you made!

© Lauren Schmidt
Cuisine: Italian

And make sure you are following me on TikTok, Instagram, and Pinterest, for all the latest recipes!

Italian Pressed Picnic Sandwich

July 31, 2018 by Lauren Schmidt 2 Comments

Italian flavors pressed into individually wrapped sandwiches, these Italian Pressed Picnic Sandwiches are full of flavor! Made ahead of time and wrapped up tight these sandwiches are perfect for picnics, summer lunches, and trips to the beach!

This post may contain Affiliate Links.

Italian Picnic Sandwiches

Ironically today’s recipe comes after my Prosciutto Pesto Burger which was based after my Italian Pressed Picnic Sandwich. These sandwiches I have been making for my family the last couple years and it has become one of our favorites! Made ahead of time these sandwiches are full of cured meats, cheeses, and flavorful pesto! Perfect for a picnic, road trip, or dinner!

My favorite place to bring these sandwiches is the beach! They are so perfect for a trip to the beach. I am able to make them ahead of time the night before, so when I am trying to get everything packed the next morning I have one less thing to worry about!

Anyone else who heads to the beach regularly with kids still have trouble knowing what to bring? I have been obsessed with this list by Make Time To See The World: 45+ BEACH ESSENTIALS TO HAVE YOU SUMMER READY IN SECONDS! Sure I know how to make a killer sandwich but how do I always forget something else I need?!

Anyone else in the same boat?? If yes check that article out!

Anyways…

If you have been following the blog this summer you might have noticed that I have been reusing many of the same ingredients. Flavorful pesto, irresistible prosciutto, salty mozzarella & provolone, and fresh tomatoes. I’d say sorry but I am really not sorry. I have done this for a couple of reasons.

First reason, ummm these things are delicious! Duh, seriously how can you resist those flavors, whatever the format they blend so perfectly.

Second reason, it actually makes my meal planning easier and cheaper. By making foods with shared ingredients I am able to cut down on grocery costs and have a better idea about what my menu should look like for the week.

Think about it, if you are making my Prosciutto Pesto Burgers you might open up a pack of prosciutto but not use it all, well viola just make Pesto Pizza later that week while the prosciutto is still fresh. So that same ingredient is used fully and not put to waste. Having a ‘flavor theme’ during a week of menu planning can make meal decisions faster and easier, give it a try!

But now let’s get down to what you really came here for, a delicious Italian Pressed Picnic Sandwich.

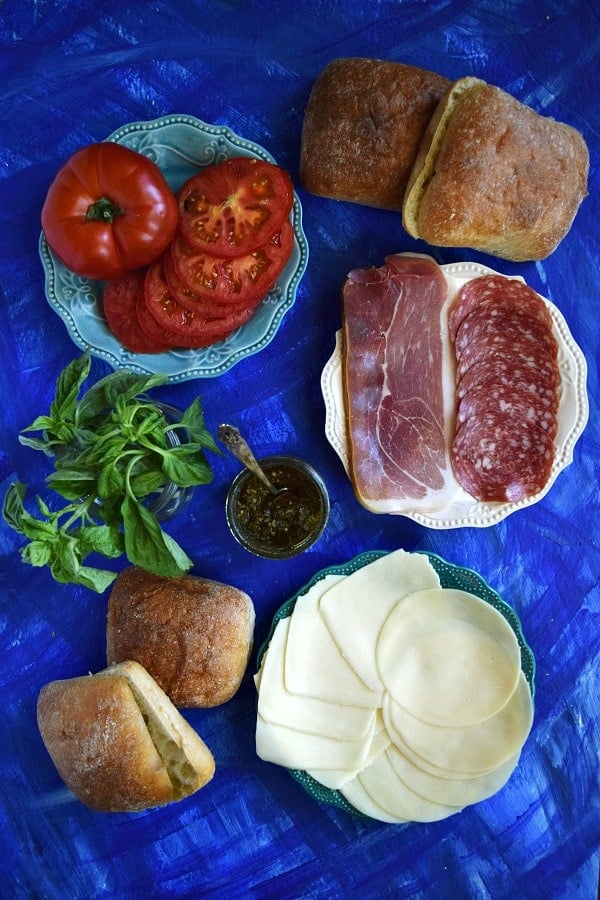
The Ingredients

Let’s start at the outside and work our way in. The bread, Ciabatta Rolls. In my version of these sandwiches I use ciabatta rolls opposed to a loaf. The rolls mean I don’t have to get a knife out and cut these down and re-wrap the sandwiches before we want to pack them for a picnic. Each sandwich is individually wrapped and pressed.

The meats. I use prosciutto and salami, these cured meats are wide spread and so delicious. It gives the sandwich that nice salty flavor and adds protein. If you aren’t a huge fan of either of these meats you can substitute a different cured meat like soppressata, capocollo, or cutatello.

The cheese. A sandwich like this deserves two cheeses. Both mozzarella and provolone work so nicely together, a nice salty mozzarella and a more flavorful provolone. Double cheese always means double happy, right!?

Tomato. The real fresh part of this sandwich. The problem with adding tomato is you have to make sure you position it correctly so it doesn’t make everything soggy. I have done some investigating work and found if you layer it between the cheese and cover it with basil leaves it makes a little barrier and it prevents that sogginess that no one likes!

Basil. I added the basil for two reasons. It tastes great! And to help prevent sandwich sogginess. Just throwing a couple leaves on top of the tomato makes a huge difference in both categories. Plus it keeps a certain freshness to the sandwich and not to mention an extra burst of flavor.

Pesto. You can’t make an Italian Pressed Picnic Sandwich without pesto, that’s not allowed. A nice smother of pesto keeps this sandwich moist without getting soggy and flavorful without overpowering all the other more subtle flavors in the sandwich. You can use a homemade pesto or a store bought pesto.

All the ingredients for an Italian Pressed Picnic Sandwich

Making & Storing the Sandwiches

It is best to build these like an assembly line opposed to one at a time. Lay out all of your roll bottoms. Layer with meats, then cheeses, tomato slices, and basil leaves. Then spread your pesto on the top roll and place on top of the basil leaves to complete your sandwich.

To press these you need to start by tightly wrapping each sandwich in cling wrap, try to not let any air pockets in the cling wrap as to not interfere with the pressing.

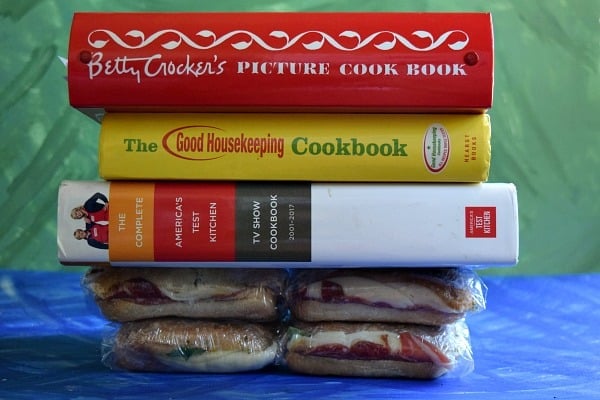
For the pressing you’ll want to make sure you have a nice open spot in your fridge for you to use. You also need to find a couple of large heavy books or a something else heavy and compact to weigh the sandwiches down. I use a couple of large cookbooks, like the really heavy +1,000 recipe kinds. Or you’ll need to place a cutting board on top with weighs, like hand weights, or heavy can goods. Whatever you choose just make sure there is some real pressure on the sandwiches.

Italian Pressed Picnic Sandwich being pressed down by large cookbooks

If you truly are bringing these on a picnic (which you should) just transfer the sandwiches to a cooler. Otherwise just unwrap and eat! These are definitely a crowd favorite and people will ask you if you will make them again!

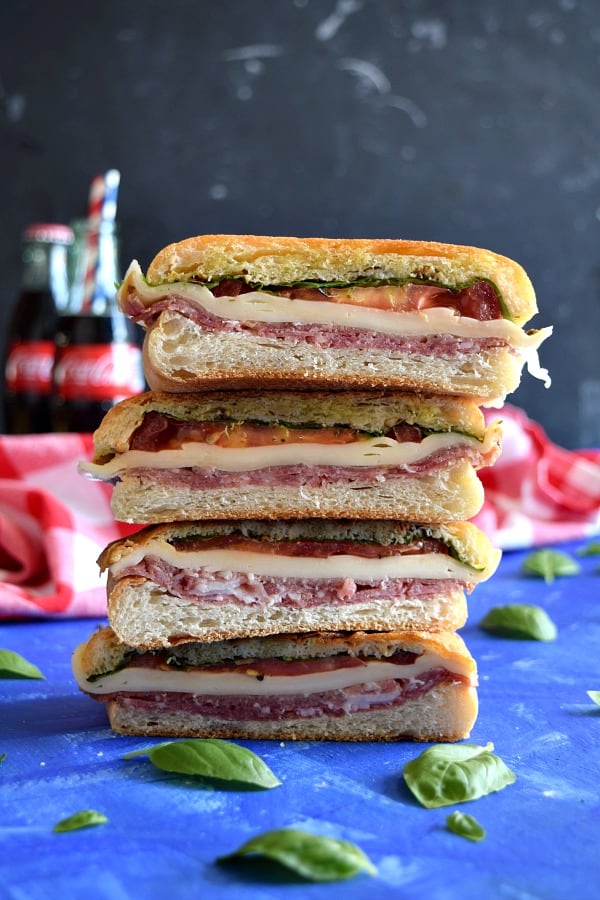
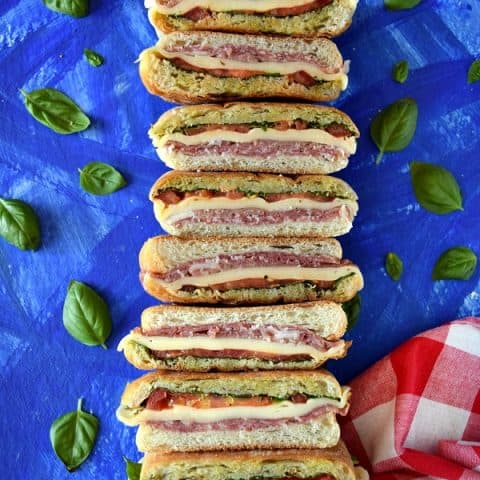
a stack of Italian Pressed Picnic Sandwich ready to eat
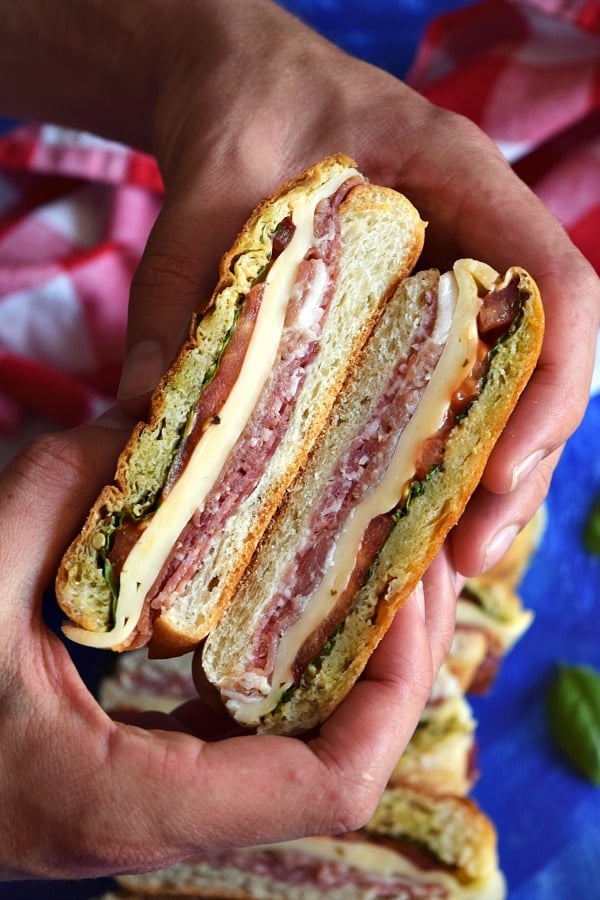
hands holding an Italian Pressed Picnic Sandwich ready to eat

TIPS & TRICKS: 

  • my Healthier Bacon Ranch Potato Salad goes perfect with these sandwiches
  • feel free to put your own spin on your Italian Pressed Picnic Sandwich, like I said above switch out the meats or even the cheeses if you feel necessary
Yield: 4 sandwich

Italian Pressed Picnic Sandwich Recipe

Italian Pressed Picnic Sandwich with a picnic napkin and basil leaves on a blue background

Italian flavors in pressed individually wrapped sandwiches, perfect for picnics and summer lunches

Prep Time 15 minutes
Resting Time (optional) 12 hours
Total Time 12 hours 15 minutes

Ingredients

  • 4 Ciabatta Rolls
  • 1 large tomato
  • 1 bunch basil
  • 4 oz salami, thinly sliced
  • 6 oz prosciutto, thinly sliced
  • 4 oz provolone, sliced
  • 4 oz mozzarella, slice
  • 4 tablespoons pesto

Instructions

  1. On the bottom half of each ciabatta rolls layer meats, then cheeses, followed by 1 or 2 slices of tomato. Cover tomato with a small handful of basil leaves. Spread 1 tablespoon of pesto on the top half of the ciabatta roll and place on top of basil leaves. 
  2. Wrap each individual sandwich tightly in a piece of cling wrap. 
  3. Place wrapped sandwiches in the refrigerator covered with weighted books.* Leave sandwiches pressed for a few hours or as long as overnight. When ready to eat, unwrap and enjoy.

Notes

*For easy access to get the sandwiches in and out of the fridge place on a cutting board. You will want a heavy weight on top of your sandwiches, I use really big cookbooks like in the picture, you could also use a smaller book with other items on top weighing it down, like hand weights or heavy cans. Get creative (but also I have made these sandwiches in a hurry without pressing them and they still tasted good).

Nutritional data is automated, final nutritional information will depend on ingredients used and any changes made.

Nutrition Information:

Yield:

4

Serving Size:

1 sandwich

Amount Per Serving: Calories: 616Total Fat: 34gSaturated Fat: 15gTrans Fat: 0gCholesterol: 64mgSodium: 1887mgCarbohydrates: 40gFiber: 3gSugar: 1gProtein: 36g

Did you make this recipe?

Please leave a comment below on the blog or share a photo with me tag @the_schmidty_wife! Can't wait to see what you made!

© Lauren Schmidt
Cuisine: Italian

Peace & Love

Lauren, The Schmidty Wife

P.S. Looking for more recipes like my Italian Pressed Picnic Sandwich? Check out my Pesto Grilled Cheese or my Prosciutto Pesto Burger.

Sunflower Seed Basil Pesto

July 10, 2018 by Lauren Schmidt 32 Comments

Sunflower Seed Basil Pesto is an easy nut free and vegan pesto made at home with sunflower seeds, garilc, lemon juice, olive oil, and basil leaves.

This post may contain Affiliate Links.

Sunflower Seed Basil Pesto - easy, nut free, & vegan

I have been crazy about pesto this summer. I have been putting it on everything pizza, pasta, sandwiches, vegetables. It is so versatile and so freaking easy to make. My Sunflower Seed Basil Pesto takes only a few ingredients and takes almost no time put together.

Now traditional pesto is made with pine nuts but have you ever seen the price of pine nuts at the grocery store. Yeah ridiculous right?! So I have always been a little hesitant to make my own until I was in a pinch lately, a sandwich emergency and I needed more pesto. So I had a bunch of basil but no pine nuts but a ton of sunflower seeds!

The results AMAZING! Since I made the Sunflower Seed Basil Pesto the one time I have been making it on a weekly basis. The sunflower seeds give it a really beautiful smooth consistency that I don’t think you can achieve using nuts. Plus pesto couldn’t be easier to make.

You’ll start out with a large bunch or two of basil and you’ll want to remove and measure the leaves. The recipe calls from 2 cups but a little more or less isn’t going to hurt anything. When I measure out my leaves I would say I loosely pack the basil into my measuring cup. I pack them in there but not so much that I’m squishing and breaking the leaves.

Next you’ll want a couple of cloves of fresh garlic. Because this recipe calls for a lot of fresh ingredients I would recommend using fresh full cloves opposed to the pre-minced garlic you can buy in jars (I’m usually all about easy but this recipe is so much better with the fresh stuff). And because this doesn’t make a ton of sauce I like 2 larger cloves in this recipe, when I tried more the garlic started to overpower the basil.

Next the smooth sunflower seeds. I use raw unsalted seeds. I haven’t tried it with roasted or salted but I imagine that it would change the recipe quite a bit. The roasting would change the flavor and consistency of the seeds and if you use salted the pesto might become too salty.

(Side note: I have learned over the past few years to always go for the unsalted varieties whether it’s nuts, seeds, or butters because that way you have full control of your salt content. Basically you can always add more salt if it needs it but you can’t remove the salt once it’s already in there.)

Lemon juice, this little bit of acid definitely helps round out the flavors big time!

And coming back to salt (& pepper) I add just a quick dash of both in. Just a dash because I love the freshness of this sauce and I don’t want my salt and pepper overpowering that freshness.

All of these above ingredients will be added to your food processor (or high powered blender).

Sunflower Seeds, Basil, and garlic in a food processor, waiting to be made into sunflower seed basil pesto

Lastly the ever so important to Pesto, Olive Oil. I am going to give a quick (in no way sponsored, just loved) pitch for California Olive Ranch. This is hands down my favorite Olive Oil you can buy in the grocery store. A lot of Olive Oil’s these days are actually sometimes mixed and cut with other oils or are sourced from different countries. California Olive Ranch is 100% Olive Oil all from California sourced olives. Plus in my personal opinion it’s also one of the best tasting.

Okay so Olive Oil. The recipe calls for ~1/3 cup. You might use less but most likely a little bit more. You’ll drizzle in the olive oil from the top opening while the machine is running until you get to a consistency you like.

freshly made sunflower seed basil pesto in the food processor

Boom. Done. You have your own homemade Sunflower Seed Basil Pesto. Ready to be slathered over sandwiches and tossed with pastas, cooked into pizzas and for adding flavor to soups. Look for some upcoming recipes featuring pesto or check out my Prosciutto Pesto Burger for some instant pesto usage!

freshly made sunflower seed basil pesto in a measuring cup

{Also wanted to give a PESTO PARTY shout out for my The Office fans. Season 7 am I right?!?}

My mom makes the best pesto in the world. And I always tell her, “Mom you should sell this. You’d make a fortune.” And she always says, “No. It’s just for family.” Well, finally I was like **** it, I’ll sell it. So I’m like, “Mom, I need you to make a ton of pesto for a pesto party for all my friends.” She’s like, “Oh, okay.” Pesto party, really? Anyway, she makes like a hundred bottles worth. It’s so good. And Phyllis just had that Mom look I wanted.

-Ryan, Season 7 ‘Garage Sale’

{Pretty sure I could come up with a relatable The Office or Parks and Rec quote for every post I do… why am I so obsessed?}

bright green Sunflower Seed Basil Pesto in a small bowl

TIPS & TRICKS:

• You might have to stop your machine occasionally to scrape the pesto off the sides of the processor, keep adding oil and scraping down until you get the consistency you want

• You can add parmesan or romano cheese if you are looking for a more classic pesto

• Keep your Sunflower Seed Basil Pesto sealed in an airtight container in the fridge, after some time sitting the pesto might become darker in color and need to be stired again, this is normal

Yield: 8 servings

Sunflower Seed Basil Pesto Recipe

Sunflower Seed Basil Pesto in a small bowl with a spoonful ready to be spread and tossed with your next meal

an easy nut free and vegan pesto made at home with sunflower seeds and basil leaves

Prep Time 5 minutes
Total Time 5 minutes

Ingredients

  • 2 cups packed basil leaves
  • 1/3 cup raw sunflower seeds
  • 2 garlic cloves
  • 1 tablespoon of lemon juice
  • salt & pepper, to taste
  • 1/3 cup olive oil, or a little more for consistency

Instructions

  1. Add basil, sunflower seeds, garlic, lemon juice, and salt & pepper to taste to a food processor or blender.
  2. Start the processor, slowly drizzle the olive oil into the food processor until a sauce forms. It might not be the whole 1/3 cup or it might take more until you get a consistency you like. 
  3. Use immediately or store for up to a week in an airtight container in the fridge.

Notes

Nutritional data is automated, final nutritional information will depend on ingredients used and any changes made.

Nutrition Information:

Yield:

8

Amount Per Serving: Calories: 90Total Fat: 10gSaturated Fat: 1gTrans Fat: 0gCholesterol: 0mgSodium: 0mgCarbohydrates: 1gFiber: 0gSugar: 0gProtein: 0g

Did you make this recipe?

Please leave a comment below on the blog or share a photo with me tag @the_schmidty_wife! Can't wait to see what you made!

© Lauren Schmidt
Cuisine: Italian / Category: Sauces and Spices

Peace & Love

Lauren, The Schmidty Wife

P.S. Looking for more sauce recipes like my Sunflower Seed Basil Pesto? Check out my 5 Minute Pizza Sauce or my Homemade Tzatziki Sauce.

i’m lauren

Welcome to my food blog, The Schmidty Wife. I’m all about making Real Fresh Food for Real Fun Families. Here you can find delicious recipes to bring the family together at the table. My recipes are for any home cook, they focus on real ingredients that people are familiar with. From crockpot meals, to easy chicken recipes, fun pizzas, and drinks everyone will find something to love!

More About Lauren

  • Facebook
  • Instagram
  • Pinterest
  • Twitter

sign up for 5 days of meals

Get 5 days of fresh dinner plans for free,
straight to your inbox!

    latest recipes

    A stack of lemon blueberry pancakes with syrup pouring over the top.

    Lemon Blueberry Pancakes

    A wine glass filled with ice and Watermelon Aperol Spritz with a watermelon wedge.

    Watermelon Aperol Spritz

    Bowl with dense white bean salad and grilled chicken garnished with parsley.

    Dense White Bean Salad

    A plate with golden brown and crispy chickpea fritters, fresh parsley, and lemon slices.

    Easy Chickpea Fritters

    spring recipes

    A stack of lemon blueberry pancakes with syrup pouring over the top.

    Lemon Blueberry Pancakes

    A grilled buffalo chicken sandwich with blue cheese coleslaw on a white plate next to some chips.

    Grilled Buffalo Chicken Sandwich

    Whiskey glasses on a table filled with ice and Irish Lemonades, garnished with lemon peel and mint leaves.

    Irish Lemonade

    A platter of grilled artichokes with a half of an artichoke on top showing off charred grill marks.

    Grilled Artichokes Recipe

    More Spring Recipes

    Browse by Category

    • Appetizers
    • Breakfast
    • Desserts
    • Drinks
    • Main Dishes
    • Side Dishes

    Browse by Protein

    • Chicken
    • Beef
    • Turkey
    • Pork
    • Meatless
    • Seafood

    never miss a new recipe

      • Instagram
      • Pinterest
      • TikTok

      2022 © The Schmidty Wife Privacy Policy Site Credits
      Back to Top